What are Kodama in Bo Path of the Teal Lotus? As you explore the gorgeous Sacred Garden, you'll stumble upon little leaves poking up from the ground. By interacting with them, you'll pull up a chubby little spirit called a Kodama. These will, once you reach Sakura City, grant you the ability to construct new buildings that will allow you to greatly improve Bo's abilities through new items and upgrades.
Do you want to know what we thought of Bo Path of the Teal Lotus review. Otherwise, continue on to find that missing kodama or two.
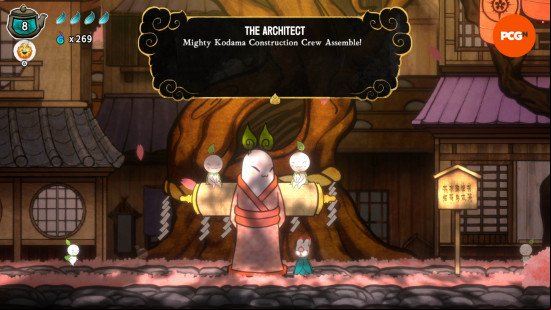
All Bo Path of the Teal Lotus kodama rewards
You might wonder if going through all the trouble to collect the kodama is worth it. We're happy to report that, yes – it definitely is. As you advance through the story, you'll unlock the ability to construct new buildings in Sakura City by speaking to The Architect located in the second tier of the city. These constructs will greatly help you on your adventure by providing new items and upgrades. Along with kodama, they require an assortment of upgrade materials that you'll readily find while exploring. The Architect doesn't tell you ahead of time what you can unlock, however, so here's a list:
- 5 kodama: Saving Shrine (automatically unlocked).
- Can save right beside The Architect.
- 10 kodama: Fast Travel Pad (unlocked after completing the Vermillion Stranger quest).
- Can fast travel from right beside The Architect.
- 12 kodama: City Archives Second Floor (unlocked after speaking to Daichi in the City Archives)
- Unlocks an area filled with lore scrolls and a Daruma upgrade.
- 20 kodama: Sumo Pagoda (unlocked after obtaining the Kabuto Wings).
- Speak to Gyoji in the first tier of the city, then speak to The Architect. Opens a mini-game with a health upgrade as a reward.
- 25 kodama: Upgraded Forge (unlocked after completing the Kitane's Crystals quest in the Kitsune Burrows).
- Can upgrade Bo's staff to max attack power.
- 30 kodama: Fox Couple House (unlocked after completing The Fox Wedding quest).
- Opens up a new Omamori shop.
- 34 kodama: Statue of the Hero (unlocked after defeating a boss in Sakura City)

All Bo Path of the Teal Lotus kodama locations
Of the eight biomes in Bo Path of the Teal Lotus, one of them, the Sencho Bridge, has no kodama for you to locate. Otherwise, the kodama are often tucked away in hard-to-reach places in the other seven areas and you'll have to later return with specific abilities to obtain them. Furthermore, sometimes there are sneaky cats pretending to be kodama that will attack you when you uproot them.
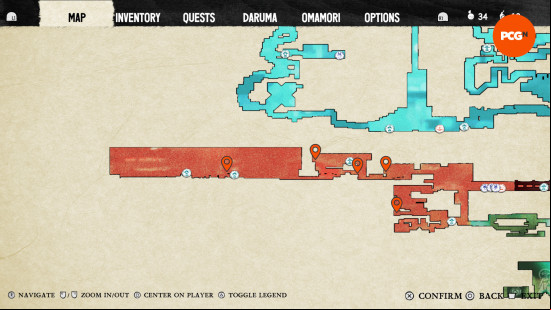
All Forest of Crimson Bamboo kodama locations
| Location |
How to get |
| At the beginning near a one-eyed lantern spirit and the second Saving Shrine. |
Return with the Equinox Staff , unlocked by speaking to Asahi. Whack the lantern to earn a double jump. |
| In the area where you first meet the two-headed To and Ri. |
Whack the spirit lanterns to reach the top left corner of the area. |
| In the area where you first meet the two-headed To and Ri. |
From just left of To and Ri, whack a lantern to reach a small alcove that leads to this kodama. |
| One screen east of the area where you first meet To and Ri. |
Lure an enemy spirit and whack it for a double jump to reach the kodama right by the entrance. |
| From the Uzumaki Cave entrance, head left and then dash through the bamboo spikes. Continue heading left. |
Requires the dash ability obtained in Uzumaki Cave. Dash and hit the lantern to dash again. |
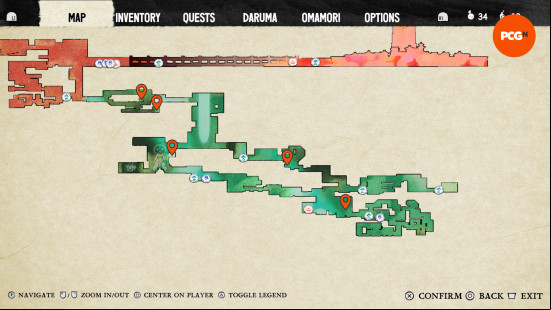
All Uzumaki Cave kodama locations
| Location |
How to get |
| Follow the path upward from the entrance. At the end, you'll see a blue bamboo barrier hugging the left-hand wall. |
Use the Bamboo Bat to hurl the rocks the nearby enemy throws to break the bamboo wall. |
| Follow the path downward from the entrance to an area with a red armakillo. |
Have the armakillo hit the right-hand wall and whack it with your staff to double jump up to the kodama. |
| East of the enemy challenge room after receiving the Chomper Daruma. |
Use the spirit lanterns to jump up to where an armapillow is hiding. Knock it down to the bottom of the room and use it to break the blue bamboo barrier. |
| One room east of the last kodama and east of the Vermillion Stranger. |
Jump above the rock throwing enemy to cause it to shoot a rock straight up. Use that rock to double jump up to the kodama. |
| In the room with the large statue. |
On the right-hand wall near the statue's head, break a hidden barrier to reveal the kodama. |
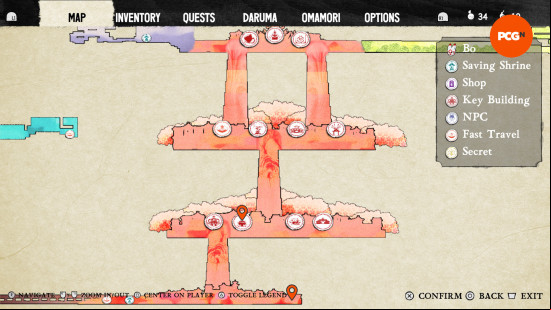
All Sakura City kodama locations
| Location |
How to get |
| Just before entering the city. |
Walk east of the city gates and pull the kodama up from behind a pink bush. You cannot see the leaf. |
| On the second floor of the City Archives building. |
This requires speaking to the Daichi the dragon within the City Archives first floor, thus unlocking the ability to restore access to the second floor of the building by speaking with The Architect. |
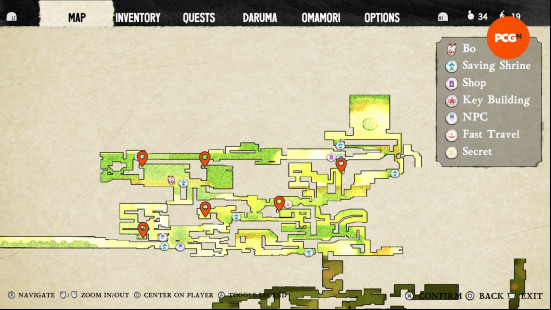
All Midori Forest kodama locations
| Location |
How to get |
| After clearing the area with many red vines and spirit lanterns. |
Head left instead of right to reach a room with large teapot wolves. Whack their projectile to jump up to the kodama. |
| In a room with many pink puffballs, northeast of the fourth Saving Shrine found in Midori Forest. |
Use the Grappling Gun on the puffballs to reach the kodama in the top left corner. |
| Directly west of the third Saving Shrine found in Midori Forest. |
Use the red spirit lanterns to reach the top left corner to find the kodama. |
| Above the second Saving Shrine accessed in Midori Forest, before the enemy challenge room. |
Return with the Grappling Gun ability. Directly above the Saving Shrine, use it to reach the kodama to the left. This is near the Deliberation Omamori. |
| At the entrance to Midori Forest. |
Return with the Mochi Mallet and break the ground just above the entrance to find this kodama. |
| Directly north and slightly east of the Midori Forest fast travel point. |
Return with the Ice Pick ability. To the right of a vine-covered area, you'll see walls you can climb up to reach the kodama. |
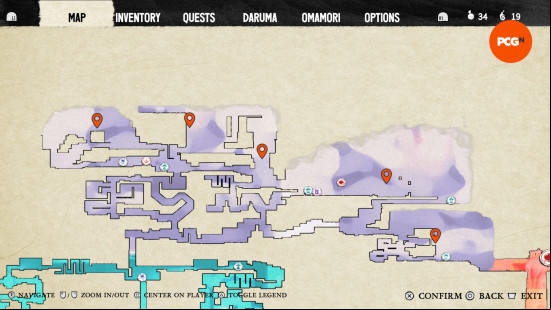
All Megumi Mountain kodama locations
| Location |
How to get |
| Right above the first Saving Shrine just outside of Sakura City. |
With the grappling gun found in Midori Forest, use it on the pink puffball just to the left of the Saving Shrine. |
| West of the Saving Shrine in the area with many air-dashing ice foxes. |
Whack the dashing ice foxes for an extra jump to reach this kodama on a small platform. Alternatively, return with the Kabuto Wings. |
| West of the Snow Village. |
Whack the ice spirit's ice shards to reach high up in the area with gusting wind to find this kodama or return later with the Kabuto Wings. |
| In the training area with Toshi the sumo beetle. |
With the Kabuto Wings ability, fly up the gust of wind to reach this kodama on the left-hand side. |
| In the area directly northwest of Moro, the giant monkey in the hotspring. |
Use the Kabuto Wings in the airstream to fly as high as you can, then glide to the left to find this kodama high up on a ledge. |

All Kitsune Burrows kodama locations
| Location |
How to get |
| Southwest of the entrance area. |
With the Tsuki Dash upgrade, return there and dash through the half-hidden pink mist on the right-hand wall. |
| East of where Mochi gives you the Tsuki Dash, behind a stone block. |
Break the stone block just by the grapple spirit in the cave's entrance to find the kodama. |
| Near the bottom of the bug infested cave where you help Mochi. |
There are two red spirit lanterns at the bottom of the cave suspended above spikes. In the northeast corner, grapple from a spirit lantern to reach an area with a hidden kodama. |
| Above where you obtain the Mochi Mallet from Mochi. |
Use the Machi Mallet to fall into the tree stump from high up on the other side. There are several fake cat kodama up here but the second-to-last one is real. |
| In the top left corner of the area with many spider enemies and gusting air. |
Use the Mochi Mallet at the right time to descend through the red vines and reach a kodama. |
| After breaking the rock west of where you first meet Mochi in the second bug cave. |
Break the stone to the right and use the Mochi Mallet in the tree trunk to reach this kodama. |
| In the second bug cave after the first Saving Shrine visited within. |
Travel up on the red spirit lanterns and then east. Look for breakable ground. Break through and use the enemy projectile to reach this kodama. |
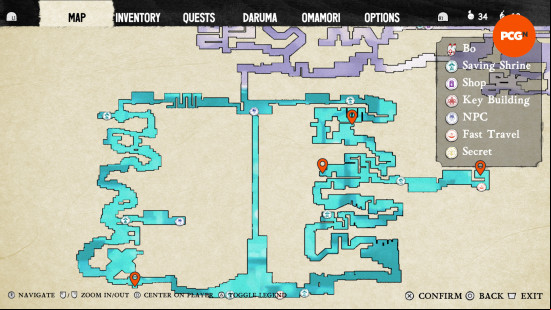
All Ice Caverns kodama locations
| Location |
How to get |
| In the eastern trial of the Tengu at two vertical pillars right inside the entrance. |
Use the Mochi Mallet when the pillars move on the breakable rock below. |
| High up in the western trial of the Tengu through a secret age to a volcano kami that gives you the Fragile Egg. |
East of the Kami in the room with the Ice Caverns East fast travel point, use the Ice Picks to reach the kodama up above. |
| West of the above secret age in a room with a spinning ice obstacle and multiple umbrella lanterns. |
Use the umbrella lanterns and the grappling hook to reach the westmost area to find this kodama. |
| North of the last kodama in a room with multiple windmill ice obstacles. |
Whack the tips of the ice obstacles to jump up to a hidden ledge on the right-hand side with a kodama. |
With all the kodama found and buildings constructed, you should be ready to head into the Imperial Palace for some tough platforming challenges and boss fights that'll make any Metroidvania fan sweat. And once you've beaten the game, you'll likely want to read about the best Metroidvania games on PC, which Bo Path of the Teal Lotus deserves to be in conversation with.


